Pages

Monday, June 30, 2014

Sweet Crepes

Sweet Crepes
Nomnomnom. I love crepes. I'd get them when I go to the night market or something. But this one time, I had it and it was super greasy. It was gross so I was sad. The next day when I was trying to figure out what to make for breakfast, I decided to just try to make it for myself. Success! And SUPER easy. I can't even believe it.

The other day I made more cuz I had some leftover whipped cream, custard and strawberries in the fridge. I figure it was the perfect way to get rid of them. Although I still like filling them with Nutella and strawberries the most. Same with K. Just blogging this with him in my lap, he's pointing at the picture and asking for more. LOL.


Sweet Crepes
(serves 4)

Ingredients:
  • 1 cup all purpose flour
  • 1/4 tsp salt
  • 3 Tbsps sugar
  • 2 eggs, beaten
  • 3/4 cup + 2 Tbsps whole milk
  • 1/2 cup water
  • 3 Tbsps butter, melted
  • 1 tsp vanilla extract
  • Butter for greasing the pan
  • Filling options: Nutella, sliced strawberries, blueberries, custard, sliced bananas, whipped cream, melted chocolate, jam, etc.

Directions:
  1. In a medium mixing bowl, whisk together flour, salt and sugar. Whisk in eggs, milk, water, butter and vanilla extract until the batter is smooth.
  2. Heat up a nonstick pan over medium heat. Coat the pan with just a light layer or butter. Pour batter in the center of the pan and swirl to spread evenly. Once the edges get dry (about a minute or so, depending on your pan), flip and cook for another 15 seconds or so, until the other side is cooked. Transfer to a plate to cool/fill. Repeat until all the batter is gone.
  3. Spread filling on one side of the crepe, fold the non-filled side over the filled side and then fold in half again. Top with whipped cream and fresh fruit.

Friday, June 27, 2014

Angel Food Cake

Angel Food Cake
Teehee. Don't mind the plate. We had both sides of the family over for Father's Day dinner, so we just had dessert on paper plates.

I'm surprised the cake turned out so well. I can't bake for the life of me. I definitely will be using liquid egg whites next time I make this. Way easier than trying to figure out what to do with all those egg yolks. :O

The cake is pretty sweet, so I definitely recommend having some whipped cream and fruit to tone it down. Either that or coffee, but the whipped cream and fresh fruit is so much better. :D


Angel Food Cake
(serves 12-16)

Ingredients:
  • 1 1/2 cup egg whites
  • 1 1/4 cup cake flour (or 1 cup, minus 1 Tbsp all purpose flour)
  • 1 3/4 cup sugar
  • 1 tsp white vinegar
  • 1 tsp vanilla extract
  • 1/4 tsp salt

Directions:
  1. In a stand mixer, whip egg whites until stiff. Stir in vinegar and vanilla extract and whip until well incorporated. Set aside.
  2. In a medium bowl, sift together flour, sugar and salt. Gently fold flour mixture into the egg whites until just combined.
  3. Pour into an ungreased tube pan and place into a cold oven.
  4. Turn the oven on and bake at 325F for an hour or so until the top cracks and is golden brown. When a cake tester is inserted, it should come out clean.
  5. Take the cake out of the oven and invert the pan to cool. Once cooled completely, use a butter knife or metal spatula to scrape along the sides and the tube to loosen cake. Gently pop it out of the pan and place onto a cake stand or plate.
  6. Use a serrated knife to cut into the cake. Serve with fresh whipped cream and fresh fruit.
Wednesday, June 25, 2014

Three Cupish Chicken

Three Cupish Chicken
I think it's too oily when you use equal parts of sesame oil to wine and soy sauce. Using half as much oil is enough, and still gives tons of flavour.

I can see why they would've had so much oil back in the day though. Oh it is so luxurious...but too fatty. :P

I had this the day after in a bowl with some of the sauce over everything. It was way yummy. Total comfort food. Once my basil plant gets enough basil, I'm going to totally make this again.


Three Cupish Chicken
(serves 2-3)

Ingredients:
  • 6 chicken drumsticks or thighs or a combination of both
  • 1/2 cup dark soy sauce
  • 1/2 cup yellow wine
  • 1/4 cup sesame oil
  • 1 head of garlic, cloves peeled and separated
  • 5 ginger slices
  • 1 Tbsp sugar
  • 1 red chili pepper (optional)
  • A handful of Thai basil leaves

Directions:
  1. In a wok or clay pot, heat up sesame oil over medium high heat. When the sesame oil shimmers, add ginger, garlic and chili pepper (if using). Cook until fragrant.
  2. Gently lay chicken in a single layer in the wok or clay pot, skin side down. Brown both sides.
  3. Add sugar, soy sauce and wine. Mix well and bring to a boil. Lower the heat and simmer, partially covered, until chicken is cooked through, about 15 minutes. Turn the chicken every once in a while so that it will get dark on all the sides.
  4. Turn off heat and toss in basil leaves. 
  5. Serve with rice ad steamed veggies.

Wednesday, June 18, 2014

Saucy Sliced Beef with Peppers & Onions

Saucy Sliced Beef with Peppers & Onions
I feel like this is from a Chinese restaurant, only it's not nearly as unhealthy as the ones you'd eat at Chinese restaurants. Or maybe it is! I don't know. I just know that I didn't use that much oil. Lol.

I really liked this. It was hearty and yummy. Very homey feeling to it. My fave kind of food. ;)


Saucy Sliced Beef with Peppers & Onions
(serves 4-6)

Ingredients:
  • 1 lb flank steak, cut into stir fry strips (see note)
  • 2 medium bell peppers, chopped
  • 1 medium onion, chopped
  • 2 green onion stalks, chopped into 1 inch long pieces and/or diced
  • 1/3 cup water
  • 1/4 cup soy sauce
  • 2 Tbsps cornstarch, divided
  • 1 Tbsp Hoisin sauce
  • 1 Tbsp sugar
  • 2 garlic cloves, minced
  • 5 slices of ginger
  • 1 Tbsp canola oil
  • 1 tsp sesame oil

Directions:
  1. In a large bowl, mix 1 1/2 tablespoon of cornstarch with the beef. Let it sit for about 15 minutes.
  2. Heat a wok over high heat. Add canola oil and wait for it to shimmer. Add beef and let it start browning for a minute. Once the beef can be moved easily without ripping any meat, toss in ginger and garlic. Stir for a few seconds until garlic gets fragrant. 
  3. Stir in peppers, onions, Hoisin sauce, sugar and soy sauce. Cook for a few seconds while you make the slurry.
  4. In a small bowl, make a slurry out of the water and remaining cornstarch. Pour into the wok and mix well.
  5. Cover and let it cook until the peppers and onions are tender. Taste and adjust seasonings if necessary.
  6. Turn off heat. Mix in green onions and sesame oil.
  7. Serve with rice and soup.

Note: Cut the steak along the grain into 2 inch wide slabs. Then position the flank so that the grain is perpendicular to you. Using a sharp knife, cut against the grain on a bias (45 degrees) into strips that you'd see in Chinese restaurant stir fries.


Monday, June 16, 2014

Coconut Lime Quinoa

Coconut Lime Quinoa
This is very cool. It's pretty "rich" tasting, which is great since quinoa can sometimes taste so "healthy". This is really good with just some pan seared white fish or any seafood honestly. I've had it with pan seared cod and with some lemony garlic shrimp.

It's the perfect thing to have when you "can't" have carbs but need something rich that tastes like carbs. A little will go a long way. It's pretty darn filling...for Hubby and me anyway.


Coconut Lime Quinoa
(serves 6-8)

Ingredients:
  • 1 400ml can coconut milk
  • 2 cups quinoa, rinsed and drained
  • 1 1/2 cups chicken/vegetable stock (or water)
  • A pinch of salt
  • Juice of 1 lime
  • 1/4 cup cilantro, chopped

Directions:
  1. Combine everything except the cilantro into a medium pot. Cover and bring to a boil. Lower the heat and simmer for 15 minutes. After the 15 minutes, turn off heat and let it rest for 5-10 minutes.
  2. Add in cilantro and mix to fluff up.
  3. Serve with seafood, grilled chicken, etc.

Friday, June 13, 2014

Lemony Garlic Shrimp

Lemony Garlic Shrimp
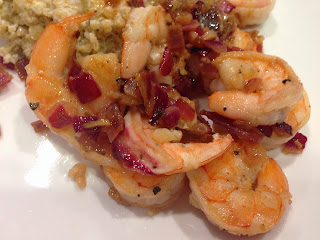
Uber simple and very lemony. It's good for when you make a rich starch or if you want to put it in a salad to add a warm component. Heck, or just have it as an appie or a snack! ;)


Lemony Garlic Shrimp
(serves 2)

Ingredients:
  • 1 lb raw shrimp, deveined and shelled
  • 1/2 small onion, finely diced
  • Juice of 1/3 of a lemon
  • 3 garlic cloves, minced
  • Salt & pepper, to taste
  • 1 Tbsp butter
  • 1 Tbsp olive oil

Directions:
  1. In a small mixing bowl, mix together garlic, shrimp, a pinch each of salt and pepper. Set aside for 5-10 minutes.
  2. Heat up a skillet over medium high heat. Add butter and olive oil. When butter and olive oil is heated, add onion and cook until just softened. Push the onions to the sides and add shrimp to the middle empty part of the skillet in one single layer.
  3. Once the shrimps start to curl, turn over to cook the other side for a few seconds until that side starts turning pink.
  4. Stir in lemon juice. Taste and add more salt and pepper, if necessary.
  5. Serve shrimp alone as an appetizer or over couscous, quinoa, pasta, in a salad, etc.

Wednesday, June 11, 2014

Ham Hash

Ham Hash
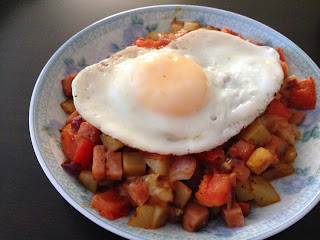
I've been watching a lot of Chopped on the Food Network and noticed that a lot of times when contestants didn't know what to do with some leftover meat ingredient, they'd just make a hash. That got me thinking when I had leftover ham steak. So I guess watching TV does teach you stuff, eh? ;)

Sunny side up eggs always look best when you cook them properly. But sometimes I'm in a rush or just impatient so I'll use a lid to cover it when frying it so that it cooks quicker. You'll notice that if you do that, the yolk won't look as golden yellow as if you finish the cooking without a lid.


Ham Hash
(serves 2)

Ingredients:
  • 2 eggs
  • 2 small russet potatoes, diced
  • 1 small onion, diced
  • 2 roma tomatoes, diced
  • 1 cup ham, diced
  • 1 tsp Cajun seasoning
  • Salt & pepper, to taste
  • 1 Tbsps canola oil, divided

Directions:
  1. In a skillet, heat up 2 teaspoons of canola oil over medium high heat. Toss in potatoes and Cajon seasoning and cook until potatoes are browned and tender.
  2. Add in onions and ham. Cook until onions are soft and ham is heated through.
  3. Stir in tomatoes and use the liquid to deglaze the pan. Cook until tomatoes are soften. Season with salt and pepper. Transfer to two separate serving dishes.
  4. Wipe out the skillet and heat up the remaining teaspoon of canola oil over medium low heat. Fry up the eggs and season with salt when the eggs are about cooked. Top each dish of hash with a fried egg.
  5. Serve with coffee, milk or juice.

Monday, June 9, 2014

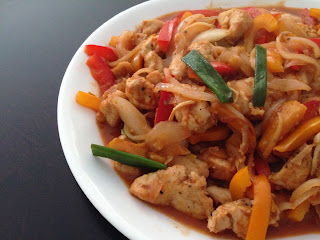
Sweet & Spicy Mango Chicken

Sweet & Spicy Mango Chicken
I've had mango chicken before, but it tasted a little weird. I'm not sure how I feel about mangoes with chicken. But this one was pretty good. It's more sweet and spicy than mango-y though. Maybe I just needed to add more? I DID add a lot of other stuff :P


Sweet & Spicy Mango Chicken
(serves 4-6)

Ingredients:
  • 1 mango, peeled, pitted and cut into 2 inch long strips
  • 2 bell peppers, thinly sliced
  • 1 small onion, thinly sliced
  • 4 slices ginger
  • 2 garlic cloves, minced
  • 2 boneless and skinless chicken breasts, cubed
  • Salt & pepper, to taste
  • 1 tsp cornstarch
  • 3 Tbsps Worcestershire sauce
  • 1/4 cup ketchup
  • 1 tsp sugar
  • 1 tsp Sriracha
  • 1 Tbsp soy sauce
  • 1 green onion, cut into 2 inch long strips
  • 1 Tbsp canola oil

Directions:
  1. In a small bowl, combine chicken with cornstarch and a pinch each of salt and pepper. Marinate for 10-15 minutes.
  2. Heat up a wok over high heat. Add canola oil. It should start shimmering. Add chicken breast.
  3. Once chicken starts turning opaque on one side, stir around. Add in ginger, garlic, peppers and onions. Toss around until the onions start to soften.
  4. Stir in mango strips, ketchup, sugar, Sriracha and soy sauce until everything is well coated in sauce. At this time, if you want your dish to be really saucy, add about 1/4 cup of water.
  5. Cover with a lid and cook until chicken is cooked through and veggies are tender crisp.
  6. Adjust seasonings if needed. Stir in green onions.
  7. Serve with rice and soup.

Friday, June 6, 2014

Preserved Lemons

Preserved Lemons
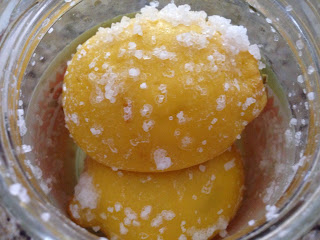
Lemons with salt cooling in the jar
Once in a while, I'll have too much junk and fried foods. So much so that I'll end up with a sore in my mouth. Usually from biting myself and it's worse when I haven't been sleeping well, but meh. This hurts like a B but putting a piece of preserved lemon on top of the sore helps.

Other times, I'll just mix it with some honey and ginger for a tea. It really does hit the spot when you're craving something sweet and salty yet refreshing. I know it sounds weird. Must be an Asian thing.

Steaming the lemons is optional. But it does get rid of that bitter taste so I recommend it.


Preserved Lemons

Ingredients:
  • Lemons
  • Kosher salt

Preserved Lemons - 1 Month Later
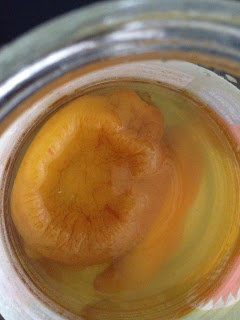
Lemons 1 month later
Directions:
  1. In a large pot, boil an inch of water with a steaming basket or steamer rack with a plate. When water has boiled, place lemons on plate or in the steamer basket. Steam lemons for 10 minutes. 
  2. After 10 minutes, transfer lemons in a wide mouth jar (do NOT pour any of the bitter lemon water from the plate into the jar). Cover with 1 cup of salt per 3 large lemons. Cool to room temperature. 
  3. Cover the jar with a lid and let lemons preserve for a month. 

Wednesday, June 4, 2014

Spicy Cucumber Salad

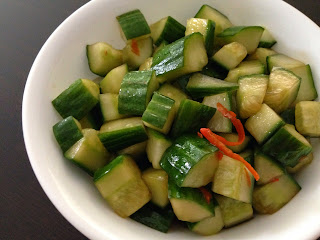
Spicy Cucumber Salad
Cucumbers are awesome as a side in the summer when you're having some sort of Asian dinner with rice and some stir fries or whatever. It's refreshing and so good for you if you've had a lot of deep fried junk like how I normally do in the summers. :P


Spicy Cucumber Salad
(serves 2-4 as a side dish)

Ingredients:
  • 1 English cucumber, diced
  • 1/2 tsp garlic chili
  • 2 Tbsps white vinegar
  • 2 Tbsps soy sauce
  • 1 tsp sesame oil
  • Salt

Directions:
  1. Place the cucumbers into a small mixing bowl. Sprinkle with a pinch of salt and let it sit for 10 minutes. After 10 minutes, squeeze out as much of the cucumber juice as possible and return back to the bowl.
  2. Add garlic chili, vinegar, soy sauce and sesame oil. Toss until well coated.
  3. Let the cucumbers marinate in the sauce for 15 minutes before serving.
  4. Serve as a side with rice and another okazu, or alone.

Monday, June 2, 2014

Korean Braised Beef Ribs

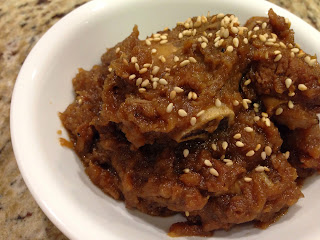
Korean Braised Beef Ribs
Maangchi is totally awesome. I essentially used her recipe to braise these ribs. I used back ribs instead of the short ribs, so then I just braised it longer. It's a little sweet if you eat it on its own with just rice, so I'd definitely make some side dishes to go with it.


Korean Braised Beef Ribs
(serves 4)

Ingredients:
  • 2 1/2 lbs beef back ribs, cut into 2 inch pieces (similar to giant pork spare ribs)
  • 2 Bosc pears, peeled & chopped
  • 1 medium onion, chopped
  • 8 garlic cloves
  • 1 inch knob of ginger
  • 1/4 cup soy sauce
  • 1 1/4 cup water
  • 1 Tbsp packed brown sugar
  • 1 tsp sesame oil
  • Sesame seeds (optional)

Directions:
  1. Fill a dutch oven or a large pot with 2 inches of water. Bring to a boil and blanch ribs for 5 minutes. Drain and rinse the ribs. Wipe down the dutch oven and add ribs. Set aside.
  2. In a food processor, add pear, onion, garlic, ginger, soy sauce, water and brown sugar and puree. Pour over ribs. Mix well and bring to a low boil. Cover the pot with a lid, but not completely; leave the lid ajar to let the steam out. Simmer for 2 hours, stirring occasionally.
  3. Uncover completely and turn heat up to medium high. Cook until almost all of the liquid is gone and the ribs are shiny, stirring  more often to prevent burning.
  4. Turn off heat. Stir in sesame oil. Transfer to a serving plate and sprinkle with sesame seeds.
  5. Serve with kimchi, rice and other side dishes.