Pages

Monday, September 30, 2013

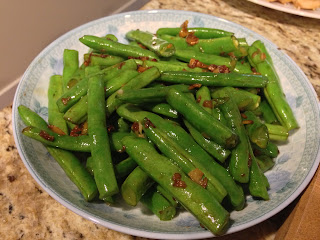
Stir Fry Green Beans

Stir Fry Green Beans
Lots of green beans! Yes, we got more from my mom in law. Organic and right from her backyard. You can't ask for any better. Except if it's from my mom. HAH! Kidding. They're the same. :P

Regardless, it's definitely better than the stuff you get at the grocery store. I dunno why. It's just sweeter. I like it more. In any case, I already had a protein to go with rice so I just quickly stir fried this to go with it. I'm surprised. Hubby actually ate quite a bit. K on the other hand...he was too busy flinging his food everywhere. In fact, I think we're going to stop letting him feed rice to himself. I don't think Hubby can take cleaning it off the floors one more time. Lol! So cute but so messy. :)


Stir Fry Green Beans
(serves 2-3)

Ingredients:
  • 1 lb green beans, cut into 2-3 inch pieces
  • 2 garlic cloves, minced
  • 1 inch knob of ginger, sliced into slivers
  • 2 Tbsps soy sauce
  • 1 tsp sesame oil
  • 2 tsps canola oil
  • 1/2 tsp sugar

Directions:
  1. In a wok on high, heat up oils. When smoking hot, toss in garlic and ginger. Stir until fragrant.
  2. Toss in green beans. Mix well. Add soy sauce and sugar. Cook, stirring frequently until beans are tender crisp.
  3. Serve as a side to a protein dish and rice.

Friday, September 27, 2013

Sesame Chicken

Sesame Chicken
It's always scary to try out new recipes. Scarier when I get them from Pinterest. It's probably because I'm always seeing articles like this one. Granted, some of these people may be messing up on purpose (cuz it's so funny), but still. It could happen!

The chicken definitely didn't turn out as dark as the pictures on Pinterest but meh. It still tasted good. I probably could've added more sugar but I cut some of it out. And I didn't add the sesame seeds (cuz I forgot) but I did add it later. Lol! And of course I didn't have any rice vinegar so I just substituted with red wine vinegar...maybe I should've used white instead. I was having just one of those days. Thank goodness everything turned out yummy. O.o

I'm going to have to do this recipe again one day with either rice vinegar or white (and take a better picture without the shadow of my hands and phone)...but below is what I did.


Sesame Chicken
(serves 3-4)

Ingredients:
  • 1 lb skinless boneless chicken thighs, cubed
  • 1 egg
  • Salt & pepper, a pinch of each
  • 3 Tbsps cornstarch, divided
  • 2 Tbsps soy sauce
  • 1 Tbsp packed brown sugar
  • 1 Tbsp red wine vinegar
  • 1 Tbsp water
  • 1 tsp sesame oil
  • 1 inch knob ginger, minced
  • 2 garlic cloves, minced
  • 2 green onions, diced
  • 1 Tbsp sesame seeds
  • 1 Tbsp canola oil

Directions:
  1. In a small/medium mixing bowl, whisk 2 tablespoons of cornstarch, salt & pepper in with the egg until all the cornstarch has dissolved. Toss in chicken and mix until chicken is well coated.
  2. Combine soy sauce, brown sugar, vinegar, water, sesame oil, ginger, garlic and 1 tablespoon of cornstarch in a small bowl until cornstarch has dissolved. Set aside. 
  3. In a large skillet, heat up canola oil on medium high heat. Add chicken and cook until chicken is brown and cooked through, stirring occasionally. 
  4. Pour soy sauce mixture over the chicken and toss until sauce thickens and coats all the chicken pieces. Turn off heat and stir in green onions.
  5. Transfer onto a serving plate and sprinkle with sesame seeds. Serve with rice and veggies.

Monday, September 23, 2013

Taco Lasagna

Taco Lasagna
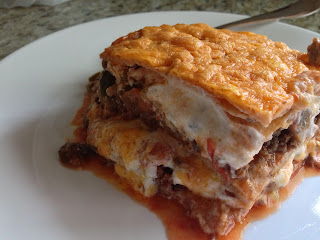
Got leftover sour cream? My first choice is always to make Mexican or Tex Mex food :P

I got a little salsa crazy too. Hence the lil pool of liquid at the bottom there. OH WELL. I just used a slotted spatula to scoop everything up. No harm done. :)

Good dinner that was done relatively quick. I did get a little distracted with K eating (read: flinging) food while I made this. He's cute, but crazy messy while he's learning to feed himself with utensils. My poor floors...


Taco Lasagna
(serves 4-6)

Ingredients:
  • 9 6" flour tortillas
  • 2 cups cheddar or Monterey Jack cheese, shredded
  • 2 lbs extra lean ground beef
  • 1 large onion, chopped
  • 1 436ml (15.5oz) jar salsa
  • 1 cup sour cream
  • 1 Tbsp chili powder
  • 1 tsp cayenne powder
  • 1 tsp cumin powder
  • 1/2 tsp dried oregano
  • Salt & pepper, to taste

Directions:
  1. Preheat oven to 375F.
  2. In a large skillet or pan, cook ground beef. Season with chili powder, cayenne powder, cumin, oregano, salt and pepper.
  3. Stir in onions and cook until onions are soft. When everything's cooked, turn off heat, drain excess fat, and set aside.
  4. In a 3 1/2 quart casserole dish, spread 3 big spoonfuls of salsa on the bottom. Layer with 3 tortillas. Top with half of ground beef mixture. Top with 1/2 of remaining salsa. Top with half of sour cream. Top with 1/3 of shredded cheese. Top with 3 tortillas. Repeat.
  5. Layer last 3 tortillas and top with remaining cheese.
  6. Bake for 30-45 minutes, or until cheese is all bubbly.
  7. Serve with a side salad.

Friday, September 20, 2013

Soy Poached Chicken

Whole Soy Poached Chicken
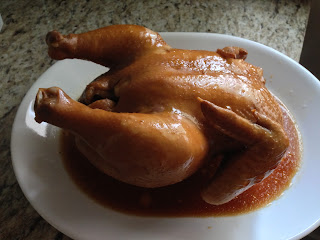
Teeheehee. So I LOVE love love a good roasted pork (belly) and Char Siu and the sausages and the duck you get at Chinese BBQ places. There's always the Soy Poached Chicken but it was never anything special to me since my mom made the most amazing soy poached chicken wings. But now that I don't live with mommy, I don't get to eat much of it anymore. Moreover, Hubby only likes the crispy versions of chicken wings (PFFT.....) so there wasn't a reason to make them at home.

HOWEVER! I recently got some roasted pork belly from my favourite Chinese BBQ place so it reminded me of this chicken. Well......whole chicken was on sale for $1.98/lb (and that's cheap here since it's usually around $2.69/lb) so off I go to the grocery store to pick up two chickens (one for poaching and one for roasting). WAHAHAHAHA! This works because Hubby likes chicken breast and as long as it's moist and I have some sort of dipping sauce for him, he'll eat it. ^^v


Soy Poached Chicken
(serves 4)

Ingredients:
  • 1 small whole chicken (2 1/2 - 3 lb)
  • 1 cup soy sauce
  • 1/2 cup dark soy sauce
  • 1 cup shaoxing wine
  • 6 cups water
  • 3 star anise
  • 1 cinnamon stick
  • 1 large rock sugar (about 1/2 cup)
  • 1 1/2 inch knob of ginger, sliced
  • 2 green onions, cut into 2 inch long pieces
  • Sesame oil (optional)

Directions:

  1. Combine everything EXCEPT the chicken in a large pot or dutch oven. Bring to a simmer (and simmer) for 10 minutes.
  2. Place chicken, breast side down, into the pot. Bring to a simmer. Cover and cook on the lowest heat for 25 minutes. Using tongs and chopsticks/fork/something, turn the chicken around so that the breast is up. Cover and simmer for another 10-15 minutes, or until internal temperature reaches 165F.
  3. Transfer chicken onto a serving platter and brush with sesame oil to give it a glossy shine (optional; I didn't do it, but you can!).
  4. Cut into sections and serve with rice, steamed veggies and a dipping sauce.

Wednesday, September 18, 2013

Veggie Sticky Rice

Veggie Sticky Rice
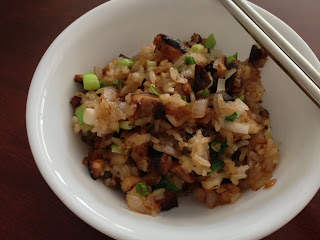
Okay, so I made this a while ago. As in a month ago. I didn't get around to putting it up though since I had other stuff I wanted to put up first. HEEHEE.

That and because I like the non-vegetarian version way more. I'm a meatatarian! I try to blame it all on Hubby but it's true. I love my meats.....for some dishes anyway and this is definitely one of those dishes. But anyway, I decided to make this vegetarian cuz I had some leftover char siu and didn't want to dice it up into this dish. I rather eat the char siu whole as a side for this rice. It worked out pretty well. I think I might be able to use this as a side dish for other meat dishes in place of plain white rice. HMMM...

Note: I did use my Instant Pot to make the sticky rice, so the 1 "cup" is really 160ml, not the traditional 240ml cups. :)


Veggie Sticky Rice
(serves 2)

Ingredients:
  • 1 "cup" sweet rice
  • 2 green onions, finely diced
  • 6 Shiitake mushrooms, rehydrated & finely diced
  • 1 small onion, finely diced
  • 3 Tbsps soy sauce
  • 1 Tbsp canola oil

Directions:
  1. Cook sweet rice in the Instant Pot using the rice option. Move onto the next step once rice is cooked.
  2. In a wok, heat up oil on high heat. Add onion and mushrooms. Cook until onions are soft. 
  3. Stir in rice. Season with soy sauce. Break up rice using a spatula and mix until everything is well incorporated. Turn off heat and mix in green onion.
  4. Serve as a side with a protein or by itself.

Monday, September 16, 2013

Parmesan Baked Fried Chicken

Parmesan Baked Fried Chicken
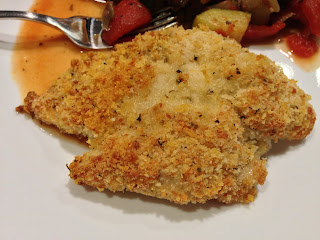
I needed a protein and something crunchy to go with my ratatouille. Something quick too since I was already making that and realized that Hubby probably won't eat it unless I pair it with some sort of meat. Darn that man and his meat addictions! Luckily I had all the ingredients on hand to make this. Whew.

The best part is that you can just cut the chicken breasts into strips and cook for only 20 minutes. Then you have chicken strips! Or cut into chunks, bake for 15 minutes and you have chicken nuggets. So easy and versatile, right? ;)


Parmesan Baked Fried Chicken
(serves 2)

Ingredients:
  • 2 skinless boneless chicken breasts
  • 1/2 cup Panko or breadcrumbs
  • 2 Tbsps Parmesan cheese, grated
  • 1/2 tsp garlic salt
  • 2 Tbsps mayonnaise
  • Salt & pepper, to taste

Directions:
  1. Line a baking sheet with parchment paper or aluminum foil. Set aside.
  2. Preheat oven to 375F.
  3. In a large Ziploc bag, combine Panko, Parmesan cheese, garlic salt and pepper. Shake to mix well. Set aside.
  4. Pat chicken breasts dry. Season both sides with salt and pepper. Spoon mayonnaise on top of the chicken breasts. Smear until well coated. 
  5. Drop one breast into the Ziploc bag. Shake until well coated. Lay on the baking sheet. Repeat with the other breast.
  6. Bake for 30 minutes, or until cooked through and breading is golden brown. Serve with side pasta or ratatouille.

Friday, September 13, 2013

Ratatouille

I watched the movie and was intrigued. But never did make any. But then I had this zucchini in the fridge and didn't have any ideas on what to do with it...Well, that's not true. I had wanted to make zucchini bread for K but was too lazy. I did have to use it up before it starts going bad, so I got some eggplant (on sale and should've gotten more) and mushrooms (also on sale!) to make ratatouille. It's always so exciting making something new. Exciting and scary since I gotta make sure that Hubby will actually eat it. And he did! He likes it. In fact, we all liked it. :)

We can't understand how it can be a meal though. It definitely needs some sort of protein with it. But that's probably cuz we love our meat so much. Although it did taste better the next day, so I can see why people would be able to eat it by itself the next day. :P


Ratatouille
(serves 4-6)

Ingredients:

  • 1 large zucchini, chopped
  • 1 large eggplant, chopped
  • 1 large onion, chopped
  • 1 lb mushrooms, chopped
  • 1 796ml (28oz) can of diced tomatoes
  • 3 garlic cloves, minced
  • 1 tsp dried sage (or 1 Tbsp fresh)
  • 1 tsp dried thyme (or 1 Tbsp fresh)
  • 1 tsp sugar
  • Salt & pepper, to taste
  • 2 Tbsps extra virgin olive oil

Directions:
  1. In a large pot or dutch oven, heat oil on medium high heat. Add in onions, garlic and mushrooms. Cook until garlic is fragrant and onions start to soften. 
  2. Add in zucchini and eggplant. Season with salt, pepper, sage and thyme. Cook until eggplant starts turning colour. 
  3. Stir in the can of tomatoes and sugar. Mix well. Bring to a boil and then lower heat to simmer for 30 minutes, covered. Season with more salt and pepper, if needed.
  4. Serve alone or with a protein.

Wednesday, September 11, 2013

Strawberry Milk

Strawberry Milk
As a kid, I used to love love LOVE strawberry milk. It was essentially strawberry flavoured syrup that I'd squeeze into my milk to make it taste like strawberries (and loads of sugar). Well, I grew up and now drink something a little more healthy than that. It's still good, but definitely healthier. And it's a quick way to squeeze some fruit into my diet. Boy, I sound so grown up, don't I? Better stop now. ;o

This is a good way to get rid of the strawberries that are too ripe. In fact, that's actually what I did the other day when I made this and took this picture. Teeheehee. :P


Strawberry Milk
(serves 1)

Ingredients:
  • 1 cup milk
  • 1-2 tsps condensed milk
  • 1/2 cup fresh strawberries, halved

Directions:
  1. In a blender, combine all the ingredients and blend. Alternatively, you can also use a stick/hand blender. I use my Magic Bullet most days. :)

Monday, September 9, 2013

Pan Fried Pork Chop

Pan Fried Pork Chop
Yum yum yum! It's pork chop! I love pork chops (really, there's very little food I don't love) and this is very similar to the one my mom used to make all the time. It was definitely a staple at our house. Mom always cut it up into pieces for us though. It made it easier to eat in a bowl with our rice. Spoiled, I know! I always liked the pieces with the bone though, so it'd be disappointing when she bought boneless pork chops. :(


Pan Fried Pork Chop
(serves 2)

Ingredients:
  • 4 bone-in pork chops
  • 2 Tbsps soy sauce
  • 1/4 cup water
  • 1 Tbsp cornstarch
  • 1/2 tsp sugar
  • Salt & pepper, to taste
  • 2 Tbsps canola oil

Directions:
  1. Use a paper towel to dry off pork chops if wet. Season both sides with salt and pepper. Set aside.
  2. In a large pan, heat up oil on medium high heat. Pan fry the pork chop until cooked, about 5 minutes on each side, depending on thickness of the cut. While pork chops are cooking, make a slurry out of the soy sauce, water, cornstarch and sugar. Set aside.
  3. When pork chops are cooked, remove from pan and place on serving dish(es). 
  4. Deglaze all the brown bits from the pan using the slurry. Cook until sauce thickens and bubbles.Pour sauce over pork chops.
  5. Serve with rice (or another form of starch) with steamed veggies.

Friday, September 6, 2013

Homemade Yellow Rice Wine

Bottled Homemade Yellow Rice Wine
So this is apparently a lost art in the Western world (or it is starting to be?). Hubby LOVES Yellow Rice Wine chicken but specifically only his grandma's yellow rice wine. All other yellow rice wine pales in comparison cuz it's not strong enough. That's what everyone in his family says anyway. I don't like this stuff so I wouldn't know. It's too strong for me. In fact, I was supposed to drink this after giving birth to K but I said no thanks, so my grandma-in-law didn't make any for me. More for them? :P

The other day I learned to make this from her. It's pretty darn cool. It's not hard. But it's a pretty lengthy process. It takes 25 days for it to age, then another day to strain. Okay, so it's not that bad, but for a girl who loves things instantly, it's pretty darn long.

Hubby's grandma will usually make HUGE vats of this stuff. That's right. VATS. Plural. She uses two rice cookers all day to make this. It's crazy. This is my first time, so I only made a small batch to test it out. I'm sorry but you'll probably end up with extra "yeast mixture". You can always store the extra in an airtight container and use it again next time. That's what grandma does anyway and who am I to argue, right?

Grandma didn't give me any measurements. She only told me how to do it and showed me. Hence the pictures. She always just used a handful of the yeast mixture and sprinkled a light layer over the rice. She did mention that you don't really need the red yeast rice. It just gives it a reddish colour and makes it "sweeter". That being said, measurements don't really matter too much for it.


Homemade Yellow Rice Wine
(makes 1 L)


Yeast Layer
Figure 1
Ingredients:
  • 6 (rice cooker) "cups" of sweet glutinous rice
  • Chinese yeast ball
  • 1-2 handful(s) red yeast rice
  • 2-3 Tbsps water, boiled and then cooled to room temperature

Rice topped with another yeast later
Figure 2
Directions:
  1. Rinse the rice until water is clear. Add to the rice cooker's inner bowl. Fill water up until the "6" line. Cover and cook rice. (I used my instant pot's rice function.)
  2. In spice grinder, grind up the Chinese yeast ball into powder. Break up the ball into 2-4 pieces/batches, if necessary. Add the red yeast to the grinder and pulse until pieces are about the size of a sesame seed. Place yeast mixture in a bowl.
  3. When rice is cooked, lay rice on cookie sheets 1 inch thick to cool. Rice must be completely cooled before going onto the next step.
  4. In an 8 litre container (or multiple containers if you don't have a big one), sprinkle about a tablespoon of the yeast mixture on the bottom of the container (see figure 1). Layer one layer of the cooled rice onto the yeast mixture. Sprinkle another tablespoon of the yeast mixture on top of the rice (see figure 2). Repeat, ending with the yeast mixture on top. You should have about an inch of space from the top of the container, so use another one if you run out of space. 
  5. Sprinkle some cooled boiled water onto the top layer of the mixture in the container. Cover the container and store in a dark warm place (eg., boiler room) for 24 hours.
  6. After 24 hours, lift the lid up a bit so the mixture can release all the "warm air" coming from the fermentation process. Leave it like this for 3 days. (You can also lift off the lid completely and drape a clean tea towel to cover the container and to keep bugs out.)
  7. After the 3 days (you're onto day 4 of the process), cover the lid again and let it rest for the rest of the week.
  8. At the end of the first week (now day 8), use clean hands and "roll over" the rice mixture from top to bottom, bottom to top. (I ended up just mixing it because I couldn't do it properly. Oops!). Cover back up and leave untouched for the remaining 25 days.
  9. On day 26, line a mesh strainer with cheesecloth. Strain the wine out of the container and into a mixing bowl with a spout for easy pouring. Squeeze as much of the wine out as possible. Pour the wine into wine bottles, cork and label.
  10. The wine can keep for a couple of years in a cool dark space. Use to cook foods, or drink as is. The fermented rice can be eaten, used as a marinade, fertilizer, etc.

The wine turned out really strong but not as sweet as Grandma's, so she suggests that I use less of the yeast mixture, which is what I did for my second batch. It's still fermenting, so I won't know how much sweeter it'll be until at least a few days later. :)
Wednesday, September 4, 2013

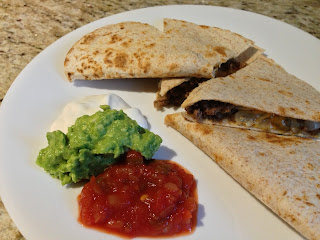
Cheeseburger Quesadilla

Cheeseburger Quesadilla
Okay, so it's a crappy picture. I was hungry and wanted to eat this right away before it got cold, so I took a quick snap and then started shoveling it into my mouth. Oh and it was wonderful. Eating this reminded me of why sometimes Hubby doesn't like going out for food. It's just sometimes yummier at home and healthier since I know exactly what went in there. There's almost nothing more satisfying than when you cook a meal and it tastes better than the stuff you can get outside......and people tell you so. :D


Cheeseburger Quesadilla
(serves 2)

Ingredients:
  • 1/3 lb extra lean ground beef
  • 2 (whole wheat) flour tortillas
  • 1 cup cheddar cheese, shredded
  • 1/2 small onion, finely diced
  • 1/2 tsp chili powder
  • 1/2 tsp ground cumin
  • Salt & pepper, to taste

Directions:
  1. In a small skillet, brown ground beef on medium high heat. Season with salt, pepper, ground cumin and chili powder. Drain off excess fat.
  2. Stir in onions and cook until translucent. Set aside.
  3. In a 10" pan or grill, lay a tortilla down and warm up on medium heat. Spread 1/4 cup of cheese on one half. When almost all melted, top with half of ground beef mixture and then top with another 1/4 cup of cheese on top. Fold the tortilla in half. Using a large spatula, flip the quesadilla over to get the remaining cheese all melty.
  4. Cut into wedges and serve with sour cream, guacamole & salsa.

Monday, September 2, 2013

Beef Lettuce Wrap

Beef Lettuce Wrap
I love lettuce wraps. They can be a little messy but I always feel like I'm eating healthier when I have them. And it's so refreshing in the summer. :)

It's probably easier to eat when using butter lettuce but green is so much easier for me to find, so I use that instead. You can also add mushrooms or bell peppers in the filling too. I just didn't have all that on hand, so it was more plain this time.


Beef Lettuce Wrap
(serves 2)

Ingredients:
  • 3/4 - 1 lb extra lean ground beef
  • 1 medium onion, finely diced
  • 1 tsp ground cumin
  • 1 Tbsp Hoisin sauce
  • Salt & pepper, to taste
  • 1 head of green lettuce, separated and dried
  • Cilantro (optional)
  • Sriracha (optional)

Directions:
  1. In a large skillet, brown the ground beef on medium high heat. Season with cumin, salt & pepper. Drain off excess grease.
  2. Stir in onions. Cook until onions are translucent. Stir in the Hoisin sauce. Add more salt and pepper if needed.
  3. To serve, spoon meat filling into the lettuce cups, add a little cilantro and a squirt or so of Sriracha.