Pages

Monday, July 29, 2013

Celery & Chicken Stirfry

Oh this is a classic. Mom always made this while we were growing up. Sis and I love it. It's very simple and I've found it to be the perfect way to get rid of extra celery.

It's probably so simple for me because I'll typically have my chicken already marinaded and frozen so all I have to do is defrost the marinaded meat, chop up the celery, extra ginger & garlic and then start stirfrying. Takes less time than to cook the rice!


Celery & Chicken Stirfry
(serves 2-3)

Ingredients:
  • 2-3 boneless skinless chicken thighs, cubed 
  • 3 Tbsps soy sauce, divided 
  • 1/2 tsp sugar 
  • 1/2 tsp salt 
  • 1/2 tsp cornstarch 
  • 4 garlic cloves, minced & divided
  • 1 inch knob of ginger, julienned & divided
  • 1 Tbsp sesame oil
  • 1 Tbsp canola oil
  • 4-6 celery stalks, cut on a bias
  • 2 Tbsp water

Directions:
  1. Combine 2 tablespoons of soy sauce, the sugar, salt, sesame oil, cornstarch, half of the garlic, and half of the ginger in a small bowl. Mix well. Add chicken and toss until well coated. Transfer into a Ziploc bag and marinate 2 hours or overnight in the fridge. 
  2. Heat canola oil in a wok on medium high heat. Brown chicken. When all browned, toss in remaining ginger and remaining garlic. Stir until garlic is fragrant.
  3. Add celery, water an remaining soy sauce. Stir to mix well and then cover. Cook for about 5-10 minutes, until celery is tender crisp and chicken is cooked through.
  4. Serve with a big bowl of jasmine rice. 

Friday, July 26, 2013

Creamy Coleslaw

Creamy ColeslawSo I was told that there are 2 types of coleslaw. The type with a creamy dressing and the type with a vinaigrette dressing. I did not know that! I've always had the creamy one and it's the on that Hubby loves. Needless to say, I had to go make a creamy one for Hubby. If he loves something that involves veggies, I try to make it lots so he actually gets SOME sort of veggies intake. Lol. Sometimes I think all wives do this to their Hubbies. :)

Creamy Coleslaw
(serves 6-8)

Ingredients:
  • 1 green cabbage, finely shredded
  • 2 medium carrots, grated
  • 1 bunch green onions, finely shredded or diced on a bias
  • 2/3 cup mayonnaise
  • 1/3 cup sugar
  • 1 Tbsp white vinegar
  • 3 Tbsp canola oil
  • Sat & pepper, to taste

Directions:
  1. In a large bowl, whisk together mayo, sugar, vinegar and oil until smooth. Season with salt and pepper to taste. 
  2. Add in shredded veggies. Mix until well coated. Chill in the fridge for at least 2 hours before serving.

You can always salt your cabbage to remove the water content in the cabbage. This'll help make the dressing less watery. We don't care though because we just strain the last bits. It's too much of a hassle to salt the cabbage and then rinse and dry the cabbage thoroughly before actually combining everything together.


Wednesday, July 24, 2013

Japchae

Japchae
I love Japchae! Hubby doesn't, so I almost never get to eat it at Korean restaurants unless we go with other people and they want to eat it too. The same goes for the seafood pancake. But that's another discussion all together.

It's simple enough to make, but I have no clue why it costs so bloody much when we have it in restaurants. It's so crazy cheap to make! I guess the hardest part is to find the noodles, but you should be able to find them in most Asian supermarkets. I always just get mine from T&T, along with all the other ingredients.

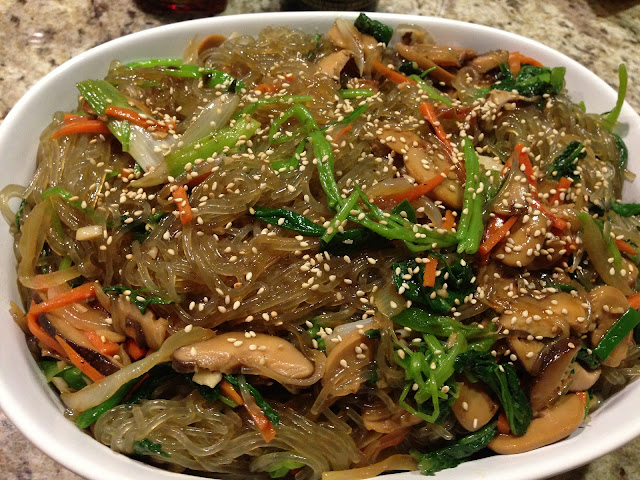
I brought this in for a potluck at work. It was pretty well received. Usually there's beef in there, but I wanted to make it vegetarian for non-meat eaters. Of course you can put any meat in there, even firm tofu if you wanted. There's no better compliment to a cook than for people to ask for the recipe and/or go back for seconds. :)

I find it to be the easiest when you use your hands to mix everything in a big bowl, so gloves are definitely recommended.


Japchae
(serves 6-8)

Ingredients:
  • 1 500g package of potato starch vermicelli noodles (dang myun)
  • 1 big bunch spinach, washed & cut into 2-3 inch pieces
  • 1 medium carrot, julienned
  • 1 medium onion, thinly sliced
  • 1 bunch green onion, cut into 1 1/2 inch pieces
  • 5-7 rehydrated shitake mushrooms with stalks removed, sliced
  • 1 cup white/brown mushrooms, sliced
  • 3 garlic cloves, minced
  • 1/3 cup sesame oil, divided
  • 1/3 cup soy sauce, divided
  • 1 Tbsp sugar
  • Sesame seeds (optional)

Directions:
  1. Bring a large pot of salted water to boil. Blanch spinach and use tongs to transfer spinach to a large mixing bowl.
  2. Using the same cooking water, cook noodles for 5 minutes or so until al dente. Rinse under cold water 3-4 times until all the starch has been removed. Add to the large mixing bowl and mix with 3 tablespoons each of soy sauce and sesame oil until well-coated. Set aside.
  3. In a large pan, stirfry onions, carrots and mushrooms in 1 tablespoon of sesame oil on medium heat until tender crisp. Stir in the garlic. Season with 1 tablespoon of soy sauce and sugar. Transfer to the large bowl and add remaining soy sauce and sesame oil.
  4. Put foodsafe gloves on and start mixing until veggies and noodles are well combined. Add more sesame oil if it's too sticky and season with more soy sauce, if necessary.
  5.  (Optional) garnish with a sprinkle of sesame seeds and serve as a full meal or as a side dish.

Dried shitake mushrooms are easy to rehydrate. Just put them in some lukewarm water for a couple of hours, and you're good to go. If you're running low on time, soak them in hot boiling water for 30-60 minutes until they don't feel hard anymore. It tastes better if you have the time to soak them in lukewarm water as opposed to the hot water though. The stalks are always woody so just chopped them off and throw them in the trash.

If you're using tofu or meat, just stirfry them first in a little sesame oil, season with a pinch of sugar and a dash of soy sauce and set it aside before stirfrying the veggies in the same pan. It'll give your veggies extra meaty flavour if using the same pan without washing or wiping it down first. :D


Monday, July 22, 2013

Whole Wheat Ricotta Gnocchi with Garlic Brown Butter Sauce

Whole Wheat Ricotta Gnocchi with Garlic Brown Butter Sauce
So normally with gnocchi you'd use regular all purpose flour, right? Well, I decided to use whole wheat instead. It's just more convenient for me. Simply because I chose to pour my whole wheat flour in a big container and left the all purpose in the large bag to encourage me to use more whole wheat and less all purpose. I guess that plan worked. :)

Anywho, I read about this new technique for making gnocchi. It looked so cool so I just had to try it. I made it with a brown butter sauce. It was crazy soft. Maybe a little too soft because I had to handle the little guys super gentle and some of them would still break off a little in the water and when I cooked them in the sauce. Oh well. Maybe I'll try regular all purpose flour next time and see how it goes. But maybe it also has to do with the fact that I don't have a food processor and just used a whisk and hand blender. :O

Hubby and I definitely agreed that if I'm going to make this next time with the brown butter sauce, I'm going to have to mix in some crab or lobster chunks.


Whole Wheat Ricotta Gnocchi with Garlic Brown Butter Sauce
(serves 4)

Ingredients:
  • 1 large egg
  • 2 cups ricotta
  • Pinch of salt & more
  • 1/2 cup whole wheat flour
  • 6 Tbsps butter
  • 1 Tbsp extra virgin olive oil
  • 2 garlic cloves, minced
  • Pepper, to taste

Directions:
  1. Line a baking sheet with parchment paper. Set aside.
  2. Bring a large pot of salted water to boil.
  3. In a medium bowl, beat egg, pinch of salt and ricotta until creamy. Add in the flour and mix until just incorporated. Scoop the mixture into a Ziploc or pastry bag. If using a Ziploc bag, cut a small hole about the size of your finger in diameter.
  4. Use a paring knife to cut off gnocchi pieces directly over the boiling salted water while squeezing the pastry/Ziploc bag. Cook until the gnocchi floats to the top. 
  5. When cooked, use a slotted spoon to scoop out gnocchi onto the parchment lined baking sheet. Set aside while you work on your sauce.
  6. In a large sauce pan, melt butter on medium heat and let brown. Keep an eye on it so it doesn't burn. As soon as the butter starts going brown, turn down the heat to low and add the olive oil, garlic, salt & pepper to taste. Stir until the garlic is fragrant. 
  7. Toss in gnocchi in the sauce until well coated. Serve as a side with a salad and some sort of protein or by itself.

Friday, July 19, 2013

Mom's "Cocktail" Salad

Mom's "Cocktail" Salad
Really, I have no clue what to call this. All I know is that it's a salad and it's a childhood favourite of mine. Every summer, my mom would make this for us and it'd be gone by the next day. Dad sometimes would MAYBE get a bowl and that was it. She'd keep it in a 4L ice cream bucket so it was easy for us to get to without spilling/breaking anything. :)

Be warned, it contains (GASP) canned cocktail fruit! I know I know...It's summer and I'm using CANNED fruit????? It just makes no sense! But I don't care because it tastes awesome and it's how my mom always made it so it's how I'm going to always make it for Kayden. The best part is that we get to put cucumbers in it. Mom had to take it out after a while because my sis didn't like cucumbers. Those were some sad times...


Mom's "Cocktail" Salad
(serves 8-12)

Ingredients:
  • 2 large cooked & cooled russet potatoes, cut into bite sized pieces
  • 5 cooled hard boiled eggs
  • 1 cucumber, seeded and diced
  • 1 796ml (28oz) can of cocktail fruit, drained
  • 2 red delicious apples, diced
  • 2/3 cup Miracle Whip
  • Pinch of salt

Directions:
  1. Separate the egg whites from the yolks. Crumble/mash the egg yolks with a fork in a small bowl. Chop up the egg whites. 
  2. In a large mixing bowl, combine all the ingredients until everything is well covered with Miracle Whip and egg yolk.
  3. Chill in the fridge at least 2 hours before serving.

Wednesday, July 17, 2013

Ahi Tuna Sesame Poke

Ahi Tuna Sesame Poke It was difficult but I managed to take a picture of this before Hubby devoured it! No, I'm kidding. I actually made this just before going to bed the other night and then left it in the fridge for him the next day. Usually he forgets to eat the food I make for him the next day, so I gave him a piece to sample first so that he'd remember it was in the fridge for him. Little did I know that it worked a little TOO well. He did actually devour it all before I could have more than one sample piece. :(

Oh well. He liked it and that's what matters. :)


Ahi Tuna Sesame Poke
(serves 2-3, or 1 hungry Hubby)

Ingredients:
  • 1 lb sushi grade Ahi tuna, cut into bite sized pieces
  • 2 tsps soy sauce
  • 1 tsp sugar
  • 1 tsp sesame oil
  • 1 tsp sesame seeds
  • 2 green onion, finely diced

Directions:
  1. In a medium mixing bowl, toss everything together until tuna is well coated. Serve with a side of sushi rice or by itself as an appetizer. If you want it saltier, just add 1/2 teaspoon of soy sauce.

Monday, July 15, 2013

Chicken Green Curry

Chicken Green CurryHubby loves green curry. I love Ted curry. But we always have red curry so I decided to give the green curry a try. It's apicier so for sure K didn't have any. The little weirdo doesn't like curries anyway. So he had peas while we had curry. No worries. He already had yogurt, cheese string and milk only an hour before we has dinner anyway. K doesn't like milk so we have to give him yogurt and cheese to make up for the milk he doesn't drink but needs. 


Chicken Green Curry
(serves 3-4)

Ingredients:
  • 2 small skinless boneless chicken breasts, cut into bite sized pieces
  • 4 ginger slices
  • 3 garlic cloves, minced
  • 2 green onion, cut into 1 inch pieces
  • 1 medium bell pepper, julienned
  • 1 small onion, sliced
  • 3-4 Tbsps green curry paste
  • 1 400ml can of coconut milk
  • 1 cup frozen peas
  • 2 tsps canola oil
  • 2 kaffir lime leaves (optional)

Directions:
  1. Heat up canola oil in a medium sauce pan on medium high heat. Stir in curry paste, kaffir lime leaves (if using), green onions, ginger and garlic. Cook until fragrant. 
  2. Add chicken, onion and bell pepper. Cook until onion is just starting to soften.
  3. Pour in coconut milk and deglaze. Bring to a gentle boil, lower heat and simmer 20 minutes, until chicken is cooked through and bell peppers are tender.
  4. Turn off the heat and mix in frozen peas. Serve with jasmine rice. 

4/28/2014 Update: I added the canola oil and onions, and updated the directions section so that this makes for a creamier curry. Hubby likes it this way more and it feels way richer, so why not?


Friday, July 12, 2013

Chicken Stew

Chicken StewI love the Sage & Bay Salt seasoning. I have it always in stock in my cabinets ready for when I make some sort of chicken soup/roast dish. I used it for chicken stew and it tasted so yummy. I only had a few spoonfuls but they were darn good spoonfuls. :)

I suppose I could've put some potatoes in there. I probably will next time, but this time we WERE going to have some potatoes on the side, so I didn't put any in there. Meh. It'll make a hearty meal with the potatoes I think.


Chicken Stew
(serves 4)

Ingredients:
  • 2 skinless boneless chicken breasts, cut into bite sized pieces
  • 2 medium carrots, chopped
  • 1 medium onion, chopped
  • 2 celery stalks, chopped
  • 3 garlic cloves, minced
  • 2 tsps Sage & Bay Salt
  • 3 1/2 cups water, divided
  • 2 Tbsps whole wheat flour (or all purpose flour)

Directions:
  1. Throw everything except for 1/2 cup of water and flour into the Instant Pot. Press the "Poultry" button and wait until the stew is done cooking - about half hour.
  2. In a small bowl, mix the 1/2 cup of water with flour and whisk until smooth to make the flour slurry.
  3. When everything is done, whisk the flour slurry into the stew. Press the "Saute" button and simmer for 15 minutes or so until the stew thickens.
  4. Serve hot. It's even better if you serve it the next day or a few hours afterwards and reheat it.

Wednesday, July 10, 2013

Potato & Egg Salad

    Potato & Egg Salad
AAhh...potato salad...I love making this in the summer. It's so crazy filling and it's summer friendly (read: very little stove time). This is very similar to the one with bacon. The big difference is that it's vegetarian, but i'st still really yummy.


Potato & Egg Salad
(serves 4)

Ingredients:
  • 1 1/2 lb russet potatoes, chopped into bite size pieces
  • 1 green onion, finely diced
  • 2 celery stalks, finely diced
  • 4 hard boiled eggs, chopped
  • 1/2 cup mayonnaise
  • 1 Tbsps horseradish Dijon mustard
  • Salt & pepper, to taste
  • 1 Tbsp lemon juice

Directions:
  1. Place potatoes in a large pot, cover with water and season with salt. Bring to a boil and cook until tender, about 10 minutes. Strain and lay on a cookie sheet to cool. 
  2. In a large mixing bowl, mix everything together. Chill in the fridge for at least 4 hours before serving.

Monday, July 8, 2013

Steamed Tofu Topped with a Minced Meat "Cookie"

Steamed Tofu Topped with a Minced Meat "Cookie"So most Chinese families have their own recipe for "minced meat cookie". It's essentially just ground meat that's been steamed with seasonings and maybe some preserved veggies. Usually the meat is pork and usually it's not really ground pork, but pork loin that's been "chopped" up with a butcher's knife into what looks like ground pork - kinda like tartare texture. I love this stuff. I grew up eating this stuff.

I also love steamed tofu with just sesame oil, ginger, green onions and soy sauce. It's very basic and very yummy. K loves it. And he loves the meat cookie (as long as it's my mom who makes it for him). I decided to just combine the two. I did leave out the green onions though since my sister doesn't like green onions. Oh well. K didn't notice cuz he was too tired to stay up for dinner. Rofl. No worries. He did have a lot of fruit before going to bed. Lol...silly guy. :)


Steamed Tofu Topped with a Minced Meat "Cookie"
(serves 2)

Ingredients:
  • 1/2 lb lean ground pork 
  • 3 Tbsp soy sauce 
  • 1/4 tsp sugar 
  • 1/4 tsp salt 
  • 1 tsp cornstarch
  • 1 tsp sesame oil
  • 2 garlic cloves, minced
  • 1/2 inch ginger knob, minced
  • 1 350g pkg soft or medium tofu

Directions:
  1. In a medium bowl, combine everything together except the tofu. Marinate 30 minutes on the counter or overnight in the fridge.
  2. Drain and rinse the tofu. Slice the block into 1/2" thick pieces. Layer on the bottom of a shallow bowl or a plate with high sides. There'll be lots of water coming out of the tofu and meat, so you'll need a dish with sides at least 1 1/2" high. 
  3. Pick off tablespoon size pieces of the marinated minced meat and dot the tops of the tofu. (If you just spread it on, you'll break/tear the tofu.)
  4. Set a steamer rack on the bottom of a large pot or wok with enough water so that the dish is suspended above the water surface. Bring water to boil. 
  5. Place dish on the steam rack. Cover and cook for 20 minutes on medium low heat.
  6. Serve with a side of rice and some steamed or stirfry veggies.

Friday, July 5, 2013

Cheesy Pasta Bake

Cheesy Pasta BakePasta used to be a main staple in our household. And then it wasn't. I'm not entirely sure what happened. But the other night we had baked pasta. God do I ever miss that. The cheesy oozy goodness is just to DIE FOR! Disclaimer: I didn't have enough cheese at home - just a little less than 2 cups. That's why the picture doesn't show all the ooey gooey goodness of some baked melty cheese.

I used to use ricotta but about 2 years ago, I decided to sub ricotta for cottage for more protein. It makes me feel better (read: healthier) when I have so much cheese everywhere. :P

Have I ever told you how much I love my dutch oven? I love it. I love it a lot. I don't even use oil when I brown meat anymore because it doesn't even stick! And I'm going to use some sort of liquid to deglaze anyway, so there's really very little point to add it. :D


Cheesy Pasta Bake
(serves 6-8)

Ingredients:
  • 1 1/2 - 2 lbs lean ground beef (or a little under 1 lb of each lean ground beef and lean ground pork)
  • 1 medium onion, chopped 
  • 3 garlic cloves, minced 
  • 1/2 tsp red chili flakes 
  • 1 Tbsp dried Italian herbs 
  • 3 bay leaves 
  • 1 796ml (28oz) can of crushed tomatoes
  • 1/2 can water
  • 1 500g tub of cottage cheese
  • 3 cups grated cheddar cheese, divided
  • 1/2 cup grated Parmesan cheese, divided
  • 1 lb uncooked short pasta (eg., penne, rotini, bowtie, etc.)
  • 1 pkg of frozen chopped spinach, defrosted & drained (optional)
  • 2 Tbsp extra virgin olive oil (optional)

Directions:
  1. Preheat oven to 375F.
  2. Heat up the oil (optional) in a large dutch oven or pot on medium high heat. Brown the meat. Season with salt and pepper.
  3. Once the meat is almost all browned, add onions. Cook until translucent. Stir in garlic and cook until fragrant. Stir in chili flakes, Italian herbs and bay leaves.
  4. Pour in the can of crushed tomatoes. Fill the can halfway with water and add to the sauce. Stir to combine and lower heat to simmer for 10 minutes, covered.
  5. In the meantime, combine the cottage cheese, 2 cups of cheddar cheese, 1/4 cup of Parmesan cheese and spinach (optional) in a large mixing bowl. Stir in the pasta until all the pasta pieces are coated with the cheese mixture.
  6. Ladle half of sauce on the bottom of a 9x13 pan. Pour the pasta and cheese mixture over the sauce, spreading it out evenly. Ladle remaining sauce over the pasta, making sure that the tops are all coated with sauce. Sprinkle on the remaining cheddar cheese and then top with the remaining Parmesan cheese.
  7. Cover the dish with aluminum foil and bake for 45-60 minutes, or until everything is all bubbly and gooey.
  8. Serve with a side of garlic toast and a side salad.

I'm not sure about anyone else, but I always oil the side of the aluminum foil that's going to touch the cheese. This ensures that I won't lose most of it to the foil. Sometimes it gets the dish's handles all oily but MEH! It saves that precious cheese! :D

The pasta will cook with all the steam and extra water we put into the sauce. I wouldn't worry. This is how I make all my baked pastas because I'm too lazy to cook the pasta first. I mean...it'd mean I have more things to wash and I'd have to spend more time in front of the stove. Now who would wanna do that? Right? Not me, that's for sure! :P

Update: I froze half of this in the freezer the last time I made it and then baked it from frozen. Make sure you bake it for an extra half hour or your pasta will only be half baked.


Wednesday, July 3, 2013

Beef Beans & Cheese Burritos

Beef MixtureSo I had purchased a big package of flour tortillas from Costco, thinking I'd make some sort of wrap or whatever for Hubby. Something he can just take out of the freezer and nuke when he's busy and need a quick lunch/snack. Well...things don't always go as planned. It just never does. I'm flaky when it comes to planning out meals. I can't help it. :(

So instead, I just made some burritos for dinner. I can still freeze them, but they were too yummy. So I just took them for lunch instead of saving them for Hubby. WAHAHAHAHA!


Beef Beans & Cheese Burritos
(serves 4)

Ingredients:
  • 1 - 1 1/2 lbs lean ground beef
  • 1 batch of Cheesy "Refried" Red Kidney Beans
  • 1 small onion, finely diced
  • 2 garlic cloves, minced
  • 2 Tbsps taco seasoning
  • 2 dashes of Worcestershire sauce
  • 2 Tbsps tomato paste
  • Salt & pepper, to taste
  • 1 Tbsp extra virgin olive oil
  • 8 12" flour tortillas

Beef Bean & Cheese BurritoDirections:
  1. In a large saucepan, heat up the oil and sauté the onions until translucent. Stir in the garlic and cook until fragrant. Add in the ground beef and brown.
  2. Stir in the taco seasoning, Worcestershire sauce and tomato paste. Lower the heat and simmer for 5-10 minutes until everything is cooked through and very little liquid remains. Set aside.
  3. Nuke the flour tortillas in the microwave on high at 48 seconds.
  4. Scoop two big spoonful of cheesy "refried" red kidney beans in the middle and scoop two big spoonful of the beef mixture on top of the beans. Tuck the sides in and roll into a burrito.
  5. Serve two per person with sour cream and salsa.

Monday, July 1, 2013

Cheesy "Refried" Red Kidney Beans

Cheesy "Refried" Red Kidney BeansOkay, fine so it doesn't look all that appetizing. But it's actually pretty darn good. K loved it when I wrapped it in some tortilla and dipped it into sour cream. That kid is learning to love sour cream, which is good for me, since I love the stuff too. Mind you, that kid also will eat raw onion. He's so weird! Just like his daddy. =\

I didn't have a can of refried beans and I didn't have any pinto beans, so I made red kidney refried beans instead. Love it! You can always change the consistency if you like it thicker. I like it a little thinner since it's easier for K to eat it. This actually makes enough to make 8 burritos if you're using it as an ingredient for burritos. That's what I did. :D


Cheesy "Refried" Red Kidney Beans
(serves 6-8)

Ingredients:
  • 1 540ml (19oz) can of red kidney beans, drained
  • 1 small onion, finely diced
  • 2 garlic cloves, minced
  • 1/2 - 1/3 cup water
  • 1 cup grated cheddar cheese
  • Salt & pepper, to taste
  • 1 Tbsp extra virgin olive oil
  • Cilantro (optional)

Directions:
  1. Heat oil in a medium saucepan on medium high heat. Sauté onions until translucent. Add garlic cloves and stir until fragrant.
  2. Pour in the beans and 1/2 cup of water. Lower heat and simmer for 10-15 minutes, or until beans are soft. Use a potato masher and mash the beans. Add more water if you want it to be thinner. Stir in cheese and season with salt and pepper.
  3. (Optional) Garnish with some cilantro if desired. Serve as a dip for tortilla chips or use as a side.